They're finished! I'm quite happy with the result, and I can't wait to see them on Taylor. Hopefully she will have some pictures from the Saratoga reenactment with her wearing them. For now, I have included photos of me wearing them with one of my regency dresses (sadly, I don't have a proper 18th century outfit to really show these off, but mitts similar to these were also worn during the early 19th century).
ETA: And now I have pics of them on Taylor! Here.
And of course, here is the pattern. Enjoy!
Taylor: A Pair of 18th Century Mitts
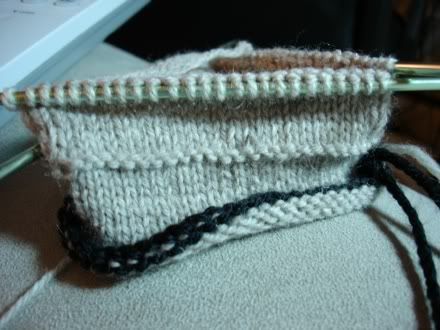
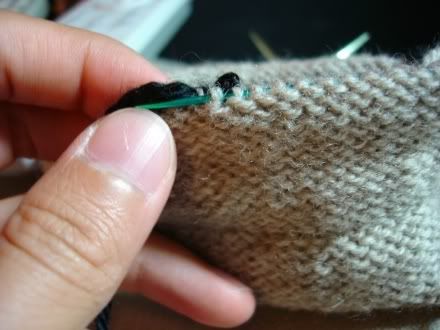
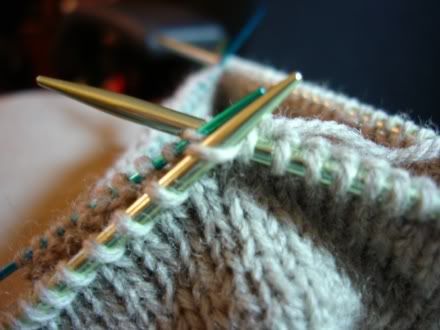
Notes: These were made for Taylor to wear to an American Revolutionary War reenactment. As such, I tried to make them historically accurate, but there are several modern modifications. (I am hoping to revise this pattern to be more accurate in the future.) First, so that I could finish these within a month, I chose to work the mitts at a corser gauge than was common during the 1700s. I chose 7 stitches to the inch, but period examples can have nearly twice as many stitches to the inch. Second, I worked a knitted hem involving a provisional cast on. I did this to give the mitts a strong edge and mimic the hem seen on these mitts at the MFA, but I'm not sure exactly how the lower edge is finished on the MFA example. My method of working a provisional cast on involves using a crochet hook, and crocheting did not become common in the West until the 19th century. You can work a knit hem without crocheting, but it would be way more annoying. Third, I sort of made up the construction of the top point. I wasn't sure how to sew on the facing. I looked at a couple period examples for clues, but I sort of improvised my solution.
Finished Size: These were made for Taylor's measurements (9" arm circumfrence right below the elbow, 6.25" wrist circumfrence, 9" length from wrist to elbow).
Materials: 2 balls of Brown Sheep Nature Spun Sport (184 yards per ball, 100% wool) in color 720 Ash (I used only about 1.5 balls, actually)
1 set of four US 2 DPNs
1 set of four US 3 DPNs
1 set of four US 2 DPNs
1 set of four US 3 DPNs
1 set of four US 0 DPNs
Small crochet hook
Small bit of waste yarn
Darning needle
Gauge: 7 stitches, 10 rows to the inch in stocking stitch.
Left Mitt:
 Using the waste yarn, a crochet hook, and the size 2 DPNs, work a provisional cast on of 70 stitches. There is a good picture tutorial on provisional cast ons here. Distribute the stitches equally on three DPNs. Join the stitches in a round, being careful not to twist them.
Work in st stitch for 1 inch. Purl one round. Switch to size 3 DPNs. Knit for another inch. Turn your knitting inside out, so that the purl side is facing you. Carefully pull out the provisional cast on and transfer these stitches to the size 0 DPNs. Fold your work in half on the purl row, so that the purl sides are facing each other. Knit the two sets of live stitches together. You can see pictures of this process here.
Place two markers, so that you have the stitches of the round divided into two equal halves of 35 stitches each. Work one round in st stitch. On the next round, you will work the decrease round. Decrease round: knit until three stitches before the first marker, ssk, K1, slip marker, K1, K2tog, work until the next marker, ssk, K1, slip marker, K1, K2tog, finish the round.
Work for another inch in st stitch, then work the decrease round. Continue in this manner (working in st stitch for one inch, work the decrease round, repeat) until the mitt is about 8 inches long, and you have worked the decrease round 8 times. You should have 38 stitches left.
Begin thumb gusset: knit until three stitches before the first marker. M1, k1, M1, knit the rest of the round. Knit one round. On the next round, knit until you reach the first M1 of the thumb gusset, then M1, K3, M1, knit the rest of the round. Knit one round. Continue increasing in this manner (increasing for the gusset every other round such that when you get to the beginning of the gusset on an increase round, you M1, knit the previous increase stitches, M1, continue) until you have worked the increase round 11 times. Knit for 5 more rounds.
Divide for thumb: Knit until you have worked three stitches into the gusset, transfer the next 17 stitches onto a piece of waste yarn, knit the rest of the round. You will be knitting over the gap created by skipping the stitches on the waste yarn, creating a hole for the thumb. Knit for five more rounds.
Bind off for the point: On the next round, bind off loosely all the stitches between the two markers on the thumb/palm side of the mitt (this is the side that has more stitches between the markers). You should have 19 live stitches left. You will now be knitting back and forth in stocking stitch on these stitches. Knit one row, picking up a stitch from your cast off edge at the end of the row, giving 20 stitches. Purl the next row.
Decrease for the point: On the next row, ssk, knit to the last two stitches, K2tog. Purl the next row. Continue in this fashion, decreasing two stitches on every knit row, and purling the purl row, until you have 4 stitches left. Bind off. Break yarn, leaving a 5 inch tail to weave in.
Finish the thumb: Transfer the thumb stitches from the waste yarn to three size 3 DPNs. Knit one round, picking up two stitches from the body of the mitt where the thumb meets the body. This gives you 19 stitches. Work 4 rounds. On the next round, knit 8 stitches, K2tog, and knit the rest of the round. Knit one more round. Bind off loosely. Break yarn, leaving a 5 inch tail to weave in.
Knitting the facing: Cast on 20 stitches onto one of your size 3 DPNs. Do not join in the round. You will be knitting back and forth. Knit one row, then purl one row. On the next row, ssk, knit to the last two stitches, K2tog. Purl the next row. Continue in this fashion, decreasing two stitches on every knit row, and purling the purl row, until you have 4 stitches left. Bind off. Break yarn, leaving a 5 inch tail to weave in.
Finishing: Whip stitch the bottom edge of the facing to the bottom of the tip on the mitt. Then sew the other two edges of the facing using a mattress stitch. Weave in ends.
Right Mitt:
Work as for the left mitt, but begin the increases for the thumb gusset 3 stitches AFTER the SECOND marker, instead of 3 stitches before the first marker.
Please let me know if you have any questions!